Let's start by saying hi to our sweet little model. Hi Lana! Today is her birthday and she was so sweet to let me take pictures of her getting her hair done on her big day!

Let's begin, shall we? The twist here isn't so much about twisting the hair as it is about sectioning, pulling pieces and twisting your hands.

Start by wetting the hair. Try to dampen only the front and crown and sides and leave the ends dry. Comb out the hair as smooth as you can. Combing it out smooth is VERY important in this style.
 Part out a vertical chunk from the part to the ear.

Divide your section in half. Take a second to look at Lana's mommy's hands. She has the most beautiful hands. Don't you agree?

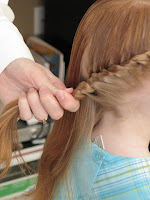
Pull the bottom half over the top half. You then take a section of hair from the underside of the hair and pull it up into the original bottom half (the next picture demonstrates this better). You usually end up with a section of hair between your thumb and forefinger and another section of hair between your forefinger and middle finger with the palm of your hand next parallel to the hair.

You always bring up hair from the bottom. Never the top. This is where the smooth, damp hair is necessary. It makes it easier to section. Thank goodness for spell check. I can never spell necessary. Twisting the new formed section, you repeat with the original top half.

See Hilary's gorgeous hands, you can see how she is holding the hair. In this style you are constantly turning your hands

Keep going.
Till you get to the end. Twist down a bit so that you don't lose the twist you just made when you secure their hair.

Take a rubber band and secure the end. It doesn't have to be anything fancy, you are just going to take this part out. If your child is older and has the patience, you can have them just hold the twist. That is what I make my Princess do, but she has almost four years on these young pups.

Repeat on the opposite side.

Pull together. Hilary pulls one side over the other. It helps with the stability of the twists. Putting them together is kind of like plates on the earth. They slip and slide and make a big old mess. Trust me and avoid the mess. Put one side on top of the other. Secure them with an elastic.

The hard part is over. Usually her hair is pulled all the way through in a ponytail, but it's her birthday and Hilary is feeling adventerous (hey, we are stay-at-home-moms, most days this is as big as we get in the creativity department) and she decided to pull the ponytail only half through.

This is why I love my friend Hilary. She always teaches me something new. Before I met her, my the ends of my daughters ribbons were all askew. She taught me that if you take your curling iron and curl the ends, it makes them look finished.
So curl your ribbon ends. I promise, it makes the world a prettier place, and isn't that the point of this blog, to make the world a prettier place?

Then curl the ends of the ponytail.

And VOILA'! You have a beautiful princess twist for a beautiful princess on the day she turns 4!

Thanks sweetie! And thanks
Hilary for being my partner in crime!


