How often do you wear ponytails? They're so cute and there's nothing more trendy when you spice it up a little bit. The hair is very vital part with your everyday look. It can tell exactly how much you take care of it. And when you srtyle it, it can give a completly different look. So if you're looking for some great ways to spice up your hair, try this amazing 5min. tutorial from A Cup Of Jo.
Split your hair into two sections, straight down the back, but off center, about 3/4. You want one large section, and then one smaller section that's about an inch or two away from your ear. Than take the larger section and make a ponytail, securing tightly with a rubber band. Twist the smaller section AWAY from your face. Make the twist as tight as you can, so it doesn't become too loose later on. After that, wrap the twisted section over the top of the ponytail and around to the bottom. Pin the twisted wrap in place. After you've secured the twist with enough pins, let it untwist and blend in with the rest of your ponytail. Done and done! SO easy!
Showing posts with label ponytail. Show all posts
The Piece-Y Pony
Need something to spice up your regular pony? Well here it is. The Beauty Dep. gave this is a perfect way to style it quickly & sitll looking amazing. Well, unfortunately, I went to my hair stylist a few weeks ago... Looks like my hair was a little bit more damaged than it thought it'll be. So, I finished with a shoulder lenght hair. Oh my, I'm still not used to it, but it seems that it fits me well. And it's better for a change, sometimes is good to jump out from your comfort zone.
Tools: curling iron, clear ponytail holder or a one that matches your haie color, some bobby pins, comb, hairspray.
Start by adding some curl to your hair from more texture. Tie a low ponytail. They made a line from the ear and used the hair on bottom for this. Then divide the top into 3 even sections. After that tease the middle section fir added volume and textures. Twist the middle secion and pin it into the low pony using bobby pins. Tease the side section for more texture. After that twist it back and pin it to the low pony using bobby pins. Repeat the teasing on the other side and, aswell, pin it to the ponytail. Pull a few pieces out aroud your face to soften the look. At the end, put some medium hold hairspray.
Stylish Side Ponytail
Now that it's hot everyday we all need a simple stylish hairstyle that we can make without using heat. This is a very quick hair tutorial that I've personally made. Actually the first one I made. My sister Anya has been very helpful and agreed to be my model for this post. We hope you'll like it and be surprised how such a wonderful pony can be made in less that 4 min.
Start by moving your hair to the side that has more hair. Tie it into a low ponytail. Note: if your hair has layers, use a few bobby pins to pin the fallen out parts. Pull the elastic down, just enough to make a hole (see picture 4.). Take the rest of your hair and put it in the hole. After that just tight it and style as you want. Pretty simple, ha?
Preparation: tease the back hair on the top of you head. For more volume read the prev. post, or just use a dry shampoo. After you put on the shampoo leave it like that for a few minutes, or you'll be left wit a powdery mess.
How To: Twisted Side Ponytail
First the explanation for the previous "photo" post. It's for your easier navigation through the blog. To view the post you want, just click on the picture of the hairstyle. The whole post is linked to Hair Tutorials. Not all hair tutorials are linked, there are just too much of them, and because it's still work in progress, I'll be adding them. Pretty cool ha? Hopefully you'll like the idea, it's very useful ( and it's going to be even better as the time goes by, and finally all hair tutorials are going to be at one place )!

Okay, let's begin! Style it by pinning a small section of hair at the back of your neck. Continue by pulling small sections of hair across and pinning along the base of the neck. Continue like that until you get a side ponytail, and leave out a section at the front. Tie off the ponytail and warp the remaining hair around the pony to cover the hairband. The girl who did this tutorial is really amazing - Katie from Skunkboy.

Okay, let's begin! Style it by pinning a small section of hair at the back of your neck. Continue by pulling small sections of hair across and pinning along the base of the neck. Continue like that until you get a side ponytail, and leave out a section at the front. Tie off the ponytail and warp the remaining hair around the pony to cover the hairband. The girl who did this tutorial is really amazing - Katie from Skunkboy.
How To: Messy Side Ponytail
Hey everyone! I recovered! I fell so much better now, and I can continue writing my posts and blogging without wanting to throw up every second of the day. So, to secure myself, I've found some awesome hair tutorials that are IN and pretty much simple, but still trendy. And now to continue where I stopped, I've found this cool step-by-step hair tutorial on A Cup Of Jo. She is amazing!
It's simple, and not so hard, You'll need at least four hair pins, and a rubber band. Don't forget to lift up your hair ( step two ), that will make a WOW effect at the end. Hope, you'll like it!
Cornrow Updo Hairstyles
While they are currently a popular style among young people, cornrows have been around for many, many years. They can be as formal or as casual as necessary, depending on the occasion. For this reason and others, cornrow updo hairstyles are versatile and great for any occasion.
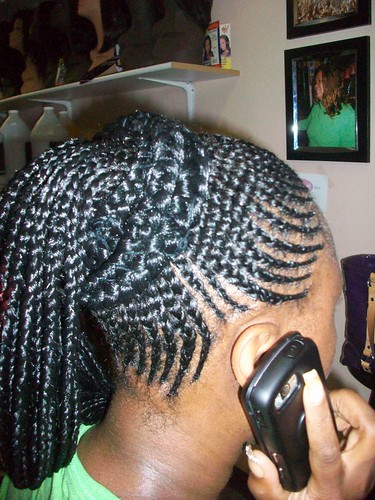
Cornrows are small braids which are plaited along the scalp, somewhat like a french braid. The process can take hours, but has great results. This hairstyle originated in Africa, and was brought to America by slaves from many different regions. They continued to braid their hair this way even in the New World, maintaining a part of their culture. In some parts of Africa, such as Nigeria, the hairstyle is primarily worn by women, while in Ethiopia, it has long been associated with warriors and kings.
These braids had fallen out of style by the middle of the 20th century, with most black women preferring to wear their hair straight. It was shocking when, in 1963, actress Cicely Tyson was seen wearing her hair in cornrows on television, and it caused many women to rethink their hairstyle. Within the next several years, many black women had begun to embrace their natural hair texture, and cornrows became popular once more.
Due to its African origin, the hairstyle is strongly associated with people of African descent. However, Bo Derek's appearance in the 1979 film '10' showed that white women could look fabulous with their hair braided too. When hip hop became popular in the 1990s, celebrities of all races were seen sporting the style.
Cornrows are an especially versatile hairstyle because of the variety of options available to the wearer. They can be washed gently and left in for weeks at a time, making them a great choice for anyone seeking a low-maintenance style. On the other hand, they can also be ideal for a sleek, red carpet look. Singers Mya, Lil Mama, Ciara, and Alicia Keys have all been spotted with their hair in tight braids, sometimes only braiding half the hair and leaving the rest in a partial Afro or a sleek bun.
The cornrow hairstyle has its roots in ancient Africa, but has firmly established itself in America as well. Although it is low maintenance, it can be equally appropriate as an everyday look or as part of a glamorous Hollywood updo, making it one of the most versatile hairstyles out there.
Advantages Of White Girl Cornrows - Cornrow Photos for White Girls
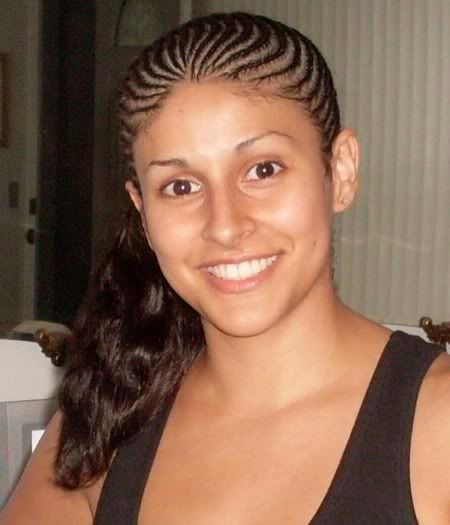
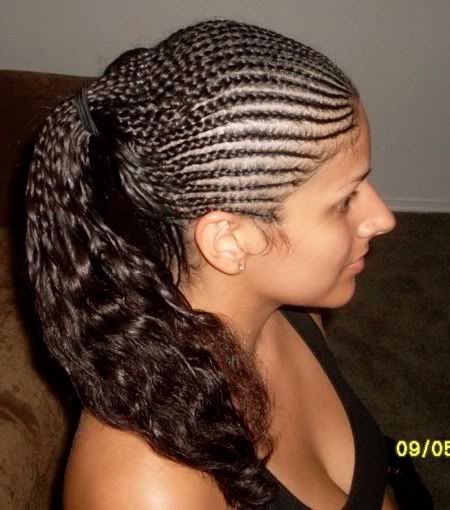
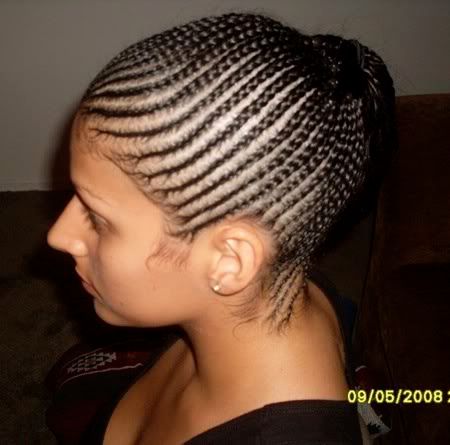
Hair can be joined together to form lines going either straight behind, or in a certain design, this style is called cornrows. The blacks mainly do this style but white girl cornrows also looks very good. The one thing is they have to be done by an expert.
With soft kind of hair like for a white girl, the lines tend to come out more easily. To ensure the lines last longer they can be done in such a way that the hair held together in a line is not much. This way they will not come off easily and they are better looking.
Cornrows are also useful to someone who does not have long hair and wants to put on a wig, The hair is done is lines before putting on the wig to prevent the wig appearing big. And the hair will definitely be neat inside as the cornrows are normally very neat. To young girls, the cornrows can be made more stylish by doing two separate hives of several lines at the top of the head and decorating them with colorful hair bands. The bands can be of the same color as the dress.
There are many things a white girl can achieve by making cornrows compared to their natural hair. The cornrows do not require attention every morning as one does not need to do anything to the cornrows. When one wants to just lazy around the house, these can be a good hairstyle to wear.
Lose of hair is not much when one has cornrows since there is no hair pulling everyday to ensure they are neat. So the hair gets a deserved rest with this style. The other good thing with cornrows is that your scalp gets refreshed since the lines leave space in between to expose the scalp. This cannot be achieved when the hair is not tied together in lines.
The other thing is that you cannot get many white girls spotting this kind of look. So for someone who wants to set herself aside in terms of hairstyle, this one can do. This hairstyle is very unique, it is not your everyday kind of style, is will surely make you get noticed.
Pictures of Cornrow Hairstyles for White Girls:
A Cute Girl with 3 Cornrows into Ponytail
This is a braided hairstyle that uses three cornrows (Dutch braids) back into a simple ponytail. The hairdo holds up well for pretty much any activity!
Braids to Ponytail with a Center Part
Sometimes my kids can pull off a center part. I started this one with the intention of French Braids, but I was told that no French Braids were allowed today, so we went with two braids to a ponytail. This one is pretty self-explanitory; I did secure each braid with an elastic before I pulled them back and I ended up leaving the elastics in, the flower covered them up. Plus I was lazy.
Side Braid to Ponytail
*Hairstyle submitted by Laurie
This is Little Londynn. Londynn is going through a braid phase right now so her mom has to come up with all sorts of variations. Here is one in particular.

Section the front part of the hair from the part to the opposite side of the part.
Braid the hair back to where your ponytail will be. Secure with an elastic.
Comb hair smooth to the ponytail and pull the braid to the ponytail.
Secure with an elastic.
Place a bow or ribbon in the hair.
Thanks for your daughters picture Laurie! We miss her!
read more "Side Braid to Ponytail"
This is Little Londynn. Londynn is going through a braid phase right now so her mom has to come up with all sorts of variations. Here is one in particular.
Section the front part of the hair from the part to the opposite side of the part.
Braid the hair back to where your ponytail will be. Secure with an elastic.
Comb hair smooth to the ponytail and pull the braid to the ponytail.
Secure with an elastic.
Place a bow or ribbon in the hair.
Thanks for your daughters picture Laurie! We miss her!
Subscribe to:
Posts (Atom)


.jpg)