Summer Nights/Floral Hair Tutorial

This tutorial is very girly and femmene, perfect way to combine braids and flowers. To be presice, the cute small wildflowers. It's simple, using the overlapping technique, and the basic braid, you can get this look in no time! Thanks again to Sincerely, Kinsey for sharing this amazing tutorial.


Preparation: You can curl your hair a day before, just so it will be easy to work with it. You'll need bobby pins and wildflowers (real or faux). Ok, start with your hair down. Begin with a small strand from each side of your head, close to your ear, warp it around to the opposite side and pin it (like in this tutorial). Repeat the process ntill you get the look from the fourth picture. After that, create a semi-loose braid with the best of your hair. Lastly, add flowers throughout your braid! 

Have a nice day friends! 
read more "Summer Nights/Floral Hair Tutorial"

Perfect Top Knot

There's nothing more atractive than a beautiful messy top knot. If you're running late on a date, or something, there's an easy technique to achieve. It's most known as the french twist. Or a knot, I'm not sure.Take a try on this amazing hair tutorial from A Cup Of Jo, that will blow you away. Would you ever wear your hair into a knot?


"1-2. Start putting your hair into a high ponytail, but don't pull the hair all the way through the rubber band. You want to end up with a little loop on top with some hair left over at the bottom. (By the way, I love doing a top knot on hair that isn't combed through, so I use my fingers to get my hair into place; that way, keeps some of the imperfect lumps and bumps. If you prefer a more polished look, you can comb your hair into a sleeker ponytail.) Tip: If your hair isn't quite long enough to get a top knot, you can also wear the knot lower down on your head.

3. Take the section of hair that's free from the rubber band and twist it.

4. Take the twist and wrap it around the base of the little loop of hair you created. If you have long hair, you may need to wrap it more than once. If you are wrapping it a few times, do it loosely…you don't want it too tight and rigid.

5-6. Use bobby pins to pin the bun in place. I like to secure my bun with four pins: one in the front, one in the back and one on either side. You may have to use more if you have thicker hair. I've also found that "U" shaped pins work better to hold thicker hair. These specific pins are great because they have a rubberized texture that helps grip hair." 


read more "Perfect Top Knot"

Growing Out Bangs...Triple Dutch Braids

My sweet niece came to spend the day with us.  

A little story about her.  Several years ago she found scissors, and we all know that NEVER ends well.  Her hair was in the process of growing out and she had some bangs that she wanted trimmed.  Well, my sister wouldn't do it "RIGHT THEN" so she found another set of scissors and took matters into her own hands.  

When my Sophie originally wanted "no more bangs", she thought it meant we had to cut them off.  We reminded her that is what my niece did and Sophie remembered and changed her tune.  

So little missy has been growing her hair out.  I have taken it upon myself to be in charge of her hair.  She is good with it, I am good with it and my little sister who is self-described as "not girly at all" is good with it.  

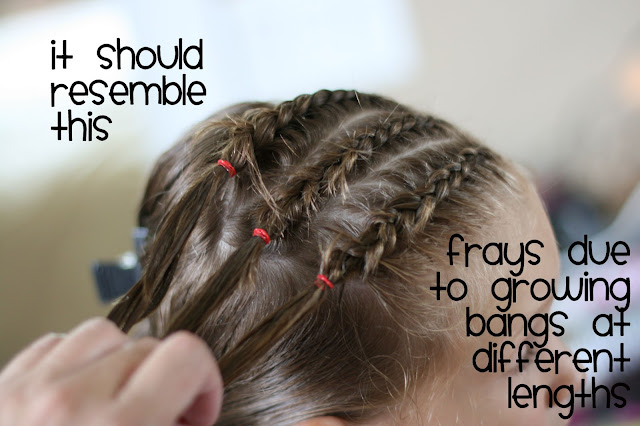
Here is another little "growing out the bangs do.  Because her hair is at different lengths, there are some wispys with the bang ends.  With the finished style, you can hardly tell.


read more "Growing Out Bangs...Triple Dutch Braids"

Get The Look: Taylor Swift

Hey everyone! Lately I've been thinking about adding something new and fresh to my blog, like a new column. Or something like that. And in the same time share with you my celebrity style icons and their amazing closet. So whenever I feel like writing, I can always turn to a little research and celebrities.
First on my list is the amazing Taylor Swift. I will be honest, I rescently became a fan of hers, well more a fan of her style. Maybe because of her new hairstyle. Those bangs really gave her a little more sophisticated look. And It suits her perfectly. And almost everything she wears is perfect for everyday wear.

On the right side you can see a very simple but chic combination of a basic white shirt, and black pants with very small dots on it. I also like the cute cardigan. It's risky to wear a cardigan with such a formal look, but the awesome Ray-Bans gave it a completely different outlook. 

bag: LAUREN MERKIN STEVIE SATCHEL
On the left side you can see a very navy combination with red jeans. Again with the Ray-Bans, but I just love it. This is a perfect everyday style that suits everyone, and it's very easy to achieve. 

shirt: DIZZY STRIPE HENLEY SHIRT
jeans: SUD EXPRES JEAN SLIM ORANGE (sold out)
bag: LAUREN MERKIN STEVIE SATCHEL


img source
When I see this look it reminds me of London. I don't know why, honestly. However I really seem to like it even thought I'm not a big fan of wearing yellow or that navy blue as a color. But, Taylor did a great job there! 
sweater: RALPH LAUREN
bag: FENDI

Sooo this is the look I definitely love the most. It's a stylish and casual. Red lipstick looks great with the whole combination, and Ray-Bans also. It's really Manhattan, without much effort. The vintage sunglasses in a cat eye shape gives it just enough glam and fills the look. Not much, but beautiful.  

shorts: DR. DENIM
bag: COACH 

img source; made by me

Taylor is promoting her new single and new album 'Red' that's coming out this October and I can't be more excited! This is another chic & basic look styled with a red lipstick and Ray-Bans. Vintage, and always IN, Taylor keeps surprising people with her own sense of style. She is original, and that's what I love about her. 
shirt: NASTY GAL
shorts: FOREVER 21
shoes: SORVAGUR
Say if it helped by leaving a comment! Happy Sunday friends! 
read more "Get The Look: Taylor Swift "

Quick Twisted Buns

Well since I have my not-so-new short hairstyle for a while now, I'm starrting to miss my long hair... Don't get me wrong, I like my short hair, bu sometimes I miss the freedom of trying all kinds of hairstyles. So, A Beautifull Mess maybe heard me, and made a post about four quick and easy hair tutorials for short hair. They are pretty good, so go and check them out here! This only one of them:


Separate your hair into three ponytails. Then twist the pony into small a bun and secure with bobby pins. Continue like that untill you finish the look! And done! 


read more "Quick Twisted Buns"

Double Braid

This is not a two braids into one hair tutorial, well actually it will just look like that. But, it's not hard at all, trust me. During the summertime it's nice to take out your ripped up denim shorts and a cute top with a tomboy denim shirt. And try this cute hairstyle! I've found this tutorial on Sincerely, Kinsey and I'm really starrting to love that blog. This beautiful hair tutorial is quick and it looks great with everything.


Preparation: a small rubber band hair tie, a few bobby pins.

Begin with your hair down. Take a section of yor hair from the thicker side of your hair, and braid all the way down. It will lie flat on your head best if you angle it back as you're braiding it. Next, slightly tug all along the braid, to make it look thicker. One the braid is done, pin it on the back far side of your head underneath the top layers of your hair, covering the bobby pin. After that braid the rest your hair into a side braid. Do the same thing like with the frirst braid, tug it all the way down. If the wind isin't cooperating, take a few spritz of hairspray to keep it in place.

Happy Wednesday friedns! 


read more "Double Braid "

Growing Out Bangs...Making it Match

This little one starts her second year of preschool in a couple of weeks and it's time to start training her hair.  She has started having a VERY big opinion about her hair.  I can't cut it, and she wants "no more bangs" and either VERY straight or "magic wand curlies".  I am a little back and forth on this one.  She has such a big forehead that I feel she just looks better with bangs.  Plus they are so little girly that it makes me feel a little sad.  
Sometimes it's as easy as tiny ponytails in colors that match her outfit.  


No bangs just makes me feel like it's official.  My last baby is growing up. 

read more "Growing Out Bangs...Making it Match"

Ombre Hair Is Back

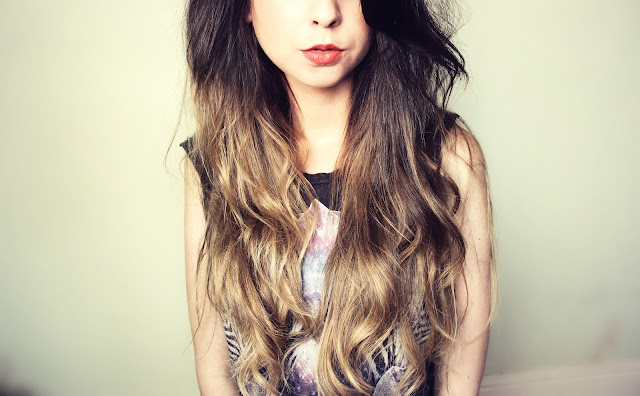
Most of you would say "Oh please, that's so last year's hairstyle", but I don't think so. Well yes it was a trend one or two years ago, but it's back! After the big pastel hair hit for summer, it became the new hair trend for this Autumn 2012 collection (my source - British Vouge). There are so many types of ombre hair, but I'm thinking on brown to pale blonde ends (I prefer that look better) or you can just play with colours. A whole host of colour combinations were on show at Prada.


img source - Zoella 

A lot of women ask what to tell their hairdresser so they could get the look that ther're asking for. The answer is very simple, just show them a picture and they'll know exactly what to do. But if you really don't  have any money, you can go and try to find some online tutorials for a DIY ombre hair look. I've alredy searched a little bit, and found a great tutorial also on Zoella - DIY Ombre Hair. Tell me what you think! 
read more "Ombre Hair Is Back"

The Perfect Holiday Hair

Here is a little secret technique for perfect holiday hair. I just love it! It looks cute and perfectly undone, and in the same time just enough. All the credits go to A Beautiful Mess, and amazing Katie. Thank you for shairng! You may think that she used a curler on the third picture, but it's actually a piece of thick fabric. It's been folded one or two times. The fabric she used was 4.5x4.5 inches and dubled over.

Start by gathering a section of hair from the top of your head. Tease it to add some textue and volume. Take the piece of fabric (already folded) and warp the hair around it like a curler. Continue rolling the hair untill you reach the scalp. Pin in place. After that, add some random braids just to add a little character.

You can add some hair accessories, just to fill the look. And done!


read more "The Perfect Holiday Hair "

Summer Simple...Two Knotted Ponytails

It's summer.  For the most part, we are lucky if hair gets brushed, let alone done.  We found some super cute hats at the beginning of summer and most of the time my little girls just plop those on or we spend most of our days lazing around "the Hill" at the pool and the hair looks a chlorinated, tangled mess.  But on rare occasions, I do get their hair done, and it's simple in the summer.


This one is an old stand by.  Two ponytails flipped into knots.  Nothing fancy, no ropes or twists or braids. Just something to keep their hair out of their faces.


****Just a little aside, we always ALWAYS start with wet hair to keep their hair fly-away free.  My girls have lightweight, soft hair.  The smooth usually only lasts for a little while unless they are straight out of the shower.  I like them to bathe at night, so the two don't mesh well.  I've tried every product on the market and one day in a moment of desperation, we discovered our secret weapon.


Warm water, infusium 23 leave-in treatment and conditioner.  We had this on hand, which is fine because we all love the coconutty smell.  I fill up the spray bottle with warm water, drop in about a teaspoon of conditoner and two-ish tablespoons of infusium 23.  It's like freshly conditioned, wet hair without having to rush to have one more person in the shower in the morning.  The weight of the conditoner helps so much and the infusium 23 keeps the flyaways to a minimum...unless your daughter wraps her head in a fleece blanket and wears it as a disguise.  I'm afraid nothing can help with that.
read more "Summer Simple...Two Knotted Ponytails"

Little Braided Bun

Yay! Well, everyone here's a brand new hair tutorial made by my dear friend Anastasia from Free & Wild and myself. Yesterday we kicked in and descied to make a very casual n' sweet hairstyle and I think this one really fills up our expectations. Normally, it's very easy, and I hope you'll enjoy it! We are both so excied!


First you'll want to braid a little braid on the side and just keep it there untill you use it. So, divide your hair into two sections. The upper section can be a little smaller than the other one. Now take the upper section and just make a low twist (like you're makeing a little bun) and pin it. Take the low section and braid a regular braid. Make sure that you don't pull it down when braiding, that'll just make a strange bump. Use an elastic to tie it. 

After that, take the braid and twist it around the mini bun. As you can see, we didn't find an elastic that matches her hair color, but you can always fix that by covering it with hair. Make sure that everything is solid so it won't fall off. At the end take the little braid and pin it under the bun. That will give you a beautiful, casual look. You won't need any hairspray, we also didn't use any hair products in this tutorial. Ana's hair is naturally thick and curly. 


read more "Little Braided Bun"

Nail Tutorial/Pink Crush

It's been a long time since I've posted a nail tutorial. Maybe because I got a little uninspired. Nail art never was a thing Im good at. But, I'm satified with just watching or adding glitter. My dear friend - Sanya, is very good at that, and she is always creative. So, all of you shoud visit her blog - When I'm Bored. I just love the name.

But, this is not about that. This tutorial is from one of my favorite blogs - The Wonder Forest. It's very simple, plus I get to add sprinkles. Hahahha. It's pretty easy adding them with a makeup sponge. They are a little bit stick so the glitter won't fall off. The white base is important to. So instead of adding multiple coats and messing everything up, you'll have the real bright color with only one coat. And just in case your nails have already dried, put a finishing colorless polish.

nail polish: FOREVER 21 "PEACH"
glitter: FOREVER 21 "CRYSTAL PINK"
read more "Nail Tutorial/Pink Crush"

Summer Braided Twist Updo

Remember Sara Lynn Paige? Her Gibson Bun tutorial is amazing! And really easy to make, it'll just look like you put some effort in it. So here's another beautiful & quick braid twist. As you already know, I always tend to post easy hair tutorials, even though it has braids or something like that. To be honest, I'm not that good at braiding them, sometimes I even mess up the regular ones. So don't worry. And for more info, visit Summer Braided Hairstyle l Katniss Reaping Braids.


You'll need to make two braids on each side of your head. Don't worry about a perfect part because you're going to comb over it so it looks like there was no part. Ok, some tips: braid your hair down your side, be careful not to pull it towards the front while braiding or you'lle be left with a strange bump when you pull it back. If you have shoulder length hair, start your braid more towards the back instead of on the side or the front. It might be a little tricky to braid behind your head, but it just takes practice.

One you finished the braiding part, pull back one side and lay it over, pin it, take the ends and tuck it underneath the braid so it won't be seen. Take the other side and pin it over the other. It doesn't really matter which side goes over the other.


Once you're done, you'll want to take a comb and just gently run over your past so it'll look clean. 
read more "Summer Braided Twist Updo"